How Do You Dry Out A House After Water Damage? A Step By Step guide
Water damage is a common problem that homeowners face due to various reasons such as flooding, broken pipes, or leaks. If not addressed promptly, water damage can lead to mold growth, structural deterioration, and an unhealthy living environment. The key to preventing these issues is to dry out the house as quickly and efficiently as possible. This article provides a step-by-step guide to help you dry out your house after water damage.
Step 1: Assess the Damage and Ensure Safety
Before starting the drying process, assess the extent of water damage in your home. Determine which areas have been affected, and identify any potential safety hazards, such as exposed electrical wires or damaged structural elements. Turn off the electricity and gas supply to the affected areas to reduce the risk of accidents. If you suspect severe damage or are unsure about the safety of your home, consult a professional before proceeding.
Step 2: Remove Excess Water
Start by removing any standing water from your home. Use a wet vacuum, a mop, or towels to soak up the water, depending on the amount present. The faster you remove excess water, the more effectively you can prevent further damage and mold growth.
Step 3: Remove Damaged Materials and Personal Belongings
Remove any damaged or soaked materials, such as carpets, rugs, furniture, and personal belongings. These items can retain moisture and hinder the drying process. If possible, salvage and clean items that have not been severely damaged. However, discard porous items like mattresses, pillows, and upholstered furniture, as they can harbor mold and bacteria.
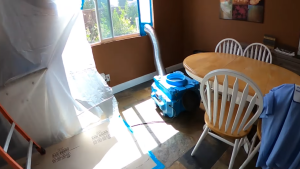
Step 4: Ventilate and Dehumidify
Open windows and doors to allow fresh air to circulate throughout your home, helping to evaporate moisture. If the outdoor humidity is high, use a dehumidifier to control the moisture levels indoors. Place fans around the affected areas to increase air circulation and speed up the drying process.
Step 5: Use Desiccants
Desiccants, such as silica gel, calcium chloride, or clay-based cat litter, can help absorb moisture from the air and surrounding materials. Place containers with desiccants in affected rooms, or sprinkle them directly on wet surfaces, and replace them regularly to maintain their effectiveness.
Step 6: Monitor and Dry Hidden Areas
Water can seep into hidden areas like wall cavities, under flooring, and behind baseboards. Use moisture meters to detect the presence of moisture in these locations. If you find dampness, create small openings in walls, baseboards, or floors to increase airflow and facilitate drying.
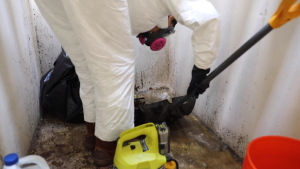
Step 7: Clean and Disinfect
Thoroughly clean and disinfect all affected surfaces to remove dirt, bacteria, and mold spores. Use a mixture of water and mild detergent for non-porous surfaces, and a solution of bleach and water (1 cup of bleach per gallon of water) for more resistant surfaces. Wear gloves and protective clothing while handling cleaning solutions to avoid irritation.
Step 8: Inspect for Mold
Inspect your home for any signs of mold growth, such as musty odors, discoloration, or visible mold colonies. If you discover mold, it is essential to address the problem immediately to prevent it from spreading. Small mold infestations can be treated with commercial mold removers or a bleach solution. However, for larger infestations, consult a mold remediation professional.
Step 9: Rebuild and Restore
Once the drying process is complete and all moisture issues have been addressed, it is time to rebuild and restore your home. This may include repairing damaged walls, floors, and ceilings, as well as repainting and refinishing surfaces. If the above steps seems difficult, contact Water Damage Restore 247 to help you completely restore your water damaged home.